只要有人追忆,往事就不必如烟。 —— 《史景迁》
本系列是针对 Spring-Framwork 5.1x 的源码分析
文章已收录至精进Spring MVC系列 系列其它文章 https://www.wormholestack.com/tag/Spring-MVC/
源码阅读环境:https://gitee.com/M-Analysis/source_springframwork5.1x 已填充关键注释
回忆杀-web.xml 时代
早年间 Servlet + Spring MVC 的时代,那熟悉的 web.xml 配置,你还记得吗
<!-- 【1】 Spring配置 -->
<listener>
    <listener-class>org.springframework.web.context.ContextLoaderListener</listener-class>
</listener>
<!-- 指定Spring Bean的配置文件所在目录。默认配置在WEB-INF目录下 -->
<context-param>
    <param-name>contextConfigLocation</param-name>
    <param-value>classpath:config/applicationContext.xml</param-value>
</context-param>


<!-- 【2】 Spring MVC配置 -->
<servlet>
    <servlet-name>spring</servlet-name>
    <servlet-class>org.springframework.web.servlet.DispatcherServlet</servlet-class>
    <!-- 可以自定义servlet.xml配置文件的位置和名称,默认为WEB-INF目录下,名称为[<servlet-name>]-servlet.xml,如spring-servlet.xml  -->
    <init-param>
        <param-name>contextConfigLocation</param-name>
        <param-value>/WEB-INF/spring-servlet.xml</param-value> // 默认
    </init-param>
    <!-- 当值为0或者大于0时,代表容器启动时加载该servlet -->
    <load-on-startup>1</load-on-startup>
</servlet>
<servlet-mapping>
    <servlet-name>spring</servlet-name>
    <url-pattern>*.do</url-pattern>
</servlet-mapping>- 【1】处,配置了 org.springframework.web.context.ContextLoaderListener 对象。这是一个 javax.servlet.ServletContextListener 对象,会初始化一个父 Root WebApplicationContext 容器。
- 【2】处,配置了 org.springframework.web.servlet.DispatcherServlet 对象。这是一个 javax.servlet.http.HttpServlet 对象,它除了拦截我们制定的 *.do 请求外,也会初始化一个属于它的 Servlet WebApplicationContext 容器。并且这个容器是以【1】处的 父 Root 容器作为父容器。
- 【1】和【2】分别会创建其对应的 WebApplicationContext 容器,并且它们是父子容器的关系。
父子容器结构如下图所示

WebApplicationContext 其实就是一个 IOC 容器,父 root WebApplicationContext 就是 Spring 容器,子 Servlet WebApplicationContext 就是 web mvc 容器。
- 应用中可以包含多个 IOC 容器。
- DispatcherServlet 的创建的子容器主要包含 Controller、View Resolvers 等和 web 相关的一些 bean。
- 父 root WebApplicationContex 主要包含包含一些基础的 bean,比如一些需要在多个 servlet 共享的 Dao、Service等 bean。
- 如果在子容器中找不到 bean 的时候可以去父容器查找 bean,达到容器隔离的效果。
父Root容器启动
首先我们将关注点放到 ContextLoaderListener 对象上。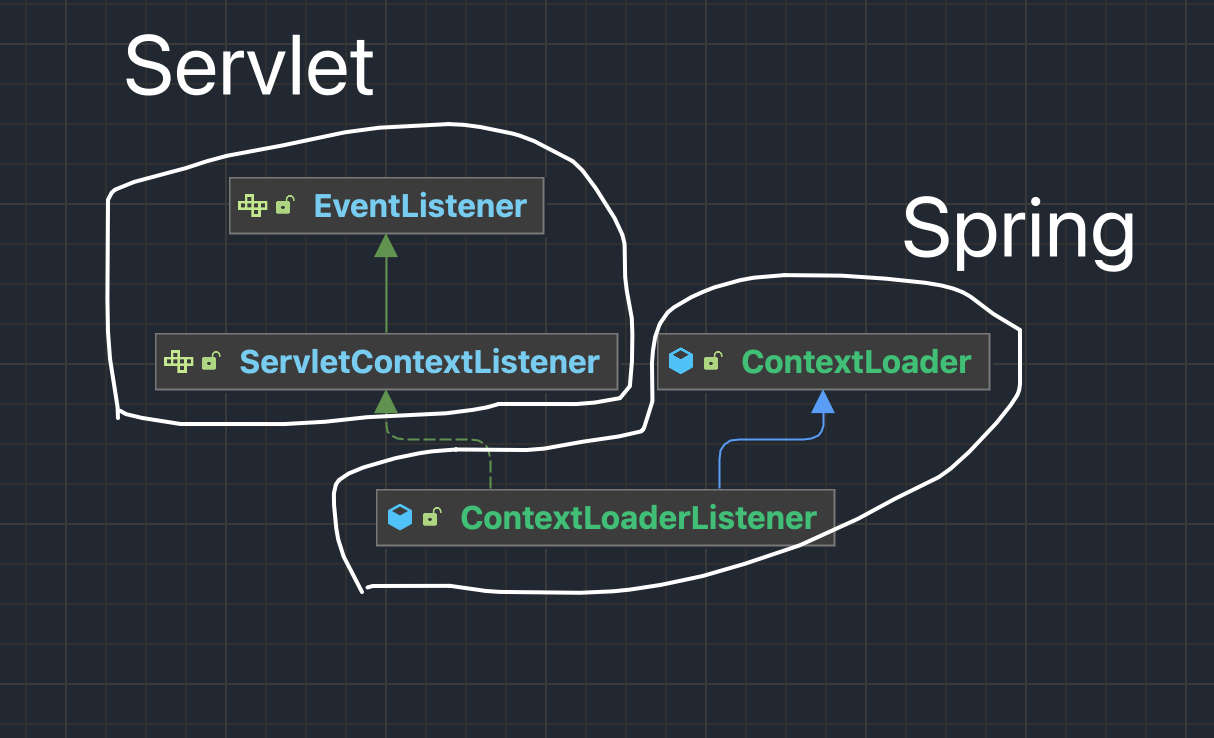
ContextLoaderListener 实现 ServletContextListener 接口,所以它是一个监听器,在 Servlet 容器启动时,例如 Tomcat 启动时会触发回调机制,用回调机制执行 contextInitialized(ServletContextEvent event) 方法
ContextLoaderListener 继承 ContextLoader 类,提供了初始化和销毁 WebApplicationContext 容器的能力
总结来说,ContextLoaderListener 实现 Servlet 容器启动和关闭时,分别初始化和销毁 WebApplicationContext 容器。
ContextLoaderListener代码如下
public class ContextLoaderListener extends ContextLoader implements ServletContextListener {

    public ContextLoaderListener() {
    }

    public ContextLoaderListener(WebApplicationContext context) {
        super(context);
    }

    @Override
    public void contextInitialized(ServletContextEvent event) {
        // Web 应用启动之后,Tomcat 触发监听钩子回调机制,初始化容器
        initWebApplicationContext(event.getServletContext());
    }

    @Override
    public void contextDestroyed(ServletContextEvent event) {
        closeWebApplicationContext(event.getServletContext());
        ContextCleanupListener.cleanupAttributes(event.getServletContext());
    }

}
两个构造函数,第二个构造函数可传入一个 WebApplicationContext ,如果传入了 WebApplicationContext 则使用传入的,否则自动创建一个。
contextInitialized 方法
调用了子类ContextLoader的 initWebApplicationContext(event.getServletContext()); 方法
public WebApplicationContext initWebApplicationContext(ServletContext servletContext) {
        // 若已经存在 ROOT_WEB_APPLICATION_CONTEXT_ATTRIBUTE 对应的 WebApplicationContext 对象,则抛出 IllegalStateException 异常
        // 例如,在 web.xml 中存在多个 ContextLoader
        if (servletContext.getAttribute(WebApplicationContext.ROOT_WEB_APPLICATION_CONTEXT_ATTRIBUTE) != null) {
            throw new IllegalStateException(
                    "Cannot initialize context because there is already a root application context present - " +
                            "check whether you have multiple ContextLoader* definitions in your web.xml!");
        }
        // 日志打印
        servletContext.log("Initializing Spring root WebApplicationContext");
        Log logger = LogFactory.getLog(ContextLoader.class);
        if (logger.isInfoEnabled()) {
            logger.info("Root WebApplicationContext: initialization started");
        }
        // 记录开始时间
        long startTime = System.currentTimeMillis();

        try {

            // 如果不是由构造函数传递过来的 WebApplicationContext,则创建一个 WebApplicationContext 对象
            if (this.context == null) {
                // 【1】关键代码,下面分析
                this.context = createWebApplicationContext(servletContext);
            }
            // 如果是 ConfigurableWebApplicationContext 的子类,如果未刷新,则进行配置和刷新
            if (this.context instanceof ConfigurableWebApplicationContext) {
                ConfigurableWebApplicationContext cwac = (ConfigurableWebApplicationContext) this.context;
                // 如果未激活(未刷新)
                if (!cwac.isActive()) {
                // 没有父容器,则进行加载并设置父容器
                    if (cwac.getParent() == null) {
                        ApplicationContext parent = loadParentContext(servletContext);
                        cwac.setParent(parent);
                    }
                    // 配置 WebApplicationContext 对象,并进行刷新
                    // 【2】关键代码,下面分析
                    configureAndRefreshWebApplicationContext(cwac, servletContext);
                }
            }
            // 记录在 servletContext中
            servletContext.setAttribute(WebApplicationContext.ROOT_WEB_APPLICATION_CONTEXT_ATTRIBUTE, this.context);

            // 记录到 currentContext 或 currentContextPerThread 中
            ClassLoader ccl = Thread.currentThread().getContextClassLoader();
            if (ccl == ContextLoader.class.getClassLoader()) {
                currentContext = this.context;
            } else if (ccl != null) {
                currentContextPerThread.put(ccl, this.context);
            }

            if (logger.isInfoEnabled()) {
                long elapsedTime = System.currentTimeMillis() - startTime;
                logger.info("Root WebApplicationContext initialized in " + elapsedTime + " ms");
            }

            return this.context;
        } catch (RuntimeException | Error ex) {
            logger.error("Context initialization failed", ex);
            // 发生异常,记录异常到 WebApplicationContext.ROOT_WEB_APPLICATION_CONTEXT_ATTRIBUTE 中,不再重新初始化。
            servletContext.setAttribute(WebApplicationContext.ROOT_WEB_APPLICATION_CONTEXT_ATTRIBUTE, ex);
            throw ex;
        }
    }
上述代码主要针对 context 对象时候为空做了响应处理,如果为空则创建一个新的 context 对象,context 是 ConfigurableWebApplicationContext 的子类,如果它未激活则进行刷新。
值得一提的是无父容器,则进行加载和设置 loadParentContext(servletContext); 默认情况下该方法返回未 null,子类 ContextLoaderListener 也没有重写这个方法,可以忽略不计.
    @Nullable
    protected ApplicationContext loadParentContext(ServletContext servletContext) {
        return null;
}接着来看下代码【1】处调用了this.context = createWebApplicationContext(servletContext);方法,完成了创建 WebApplicationContext 对象的过程
    protected WebApplicationContext createWebApplicationContext(ServletContext sc) {
        // 【1】获取 context 的类
        Class<?> contextClass = determineContextClass(sc);
        // 判断 context 类是否是 ConfigurableWebApplicationContext 类型 (WebApplicationContext 是 ConfigurableWebApplicationContext 的父类所以满足)
        if (!ConfigurableWebApplicationContext.class.isAssignableFrom(contextClass)) {
            throw new ApplicationContextException("Custom context class [" + contextClass.getName() +
                    "] is not of type [" + ConfigurableWebApplicationContext.class.getName() + "]");
        }
        // 创建 context 对象
        return (ConfigurableWebApplicationContext) BeanUtils.instantiateClass(contextClass);
    }
【1】处获取 context 的类实现如下
protected Class<?> determineContextClass(ServletContext servletContext) {
        //  获取 ServletContext 中 参数 contextClass 的值
        String contextClassName = servletContext.getInitParameter(CONTEXT_CLASS_PARAM);
        // 如果 contextClass 不为空,则直接获取该类
        if (contextClassName != null) {
            try {
                return ClassUtils.forName(contextClassName, ClassUtils.getDefaultClassLoader());
            } catch (ClassNotFoundException ex) {
                throw new ApplicationContextException(
                        "Failed to load custom context class [" + contextClassName + "]", ex);
            }
        } else {
            // 否则从 defaultStrategies 中获取,也就是从 ContextLoader.properties 配置中获取
            contextClassName = defaultStrategies.getProperty(WebApplicationContext.class.getName());
            try {
                return ClassUtils.forName(contextClassName, ContextLoader.class.getClassLoader());
            } catch (ClassNotFoundException ex) {
                throw new ApplicationContextException(
                        "Failed to load default context class [" + contextClassName + "]", ex);
            }
        }
    }
通常情况我们不会主动配置 ServletContext 的 context 类,所以基本都是从 ContextLoader.properties 配置中获取.
回到 initWebApplicationContext(event.getServletContext()); 方法中,来看下代码【2】处 调用了configureAndRefreshWebApplicationContext(cwac, servletContext);
protected void configureAndRefreshWebApplicationContext(ConfigurableWebApplicationContext wac, ServletContext sc) {
        // 【1】如果 wac 使用了默认编号,则重新设置 id
        if (ObjectUtils.identityToString(wac).equals(wac.getId())) {
            // 使用 contextId 属性
            String idParam = sc.getInitParameter(CONTEXT_ID_PARAM);
            // 重新设置 id
            if (idParam != null) {
                wac.setId(idParam);
            } else {
                // 自动生成一个 id
                wac.setId(ConfigurableWebApplicationContext.APPLICATION_CONTEXT_ID_PREFIX +
                        ObjectUtils.getDisplayString(sc.getContextPath()));
            }
        }

        wac.setServletContext(sc);
        // 【2】从配置中获取 contextConfigLocation
        String configLocationParam = sc.getInitParameter(CONFIG_LOCATION_PARAM);
        // 不为空则设置
        if (configLocationParam != null) {
            wac.setConfigLocation(configLocationParam);
        }


        ConfigurableEnvironment env = wac.getEnvironment();
        if (env instanceof ConfigurableWebEnvironment) {
            ((ConfigurableWebEnvironment) env).initPropertySources(sc, null);
        }
        // 【3】定制化 context
        customizeContext(sc, wac);
        // 【4】context 刷新,执行初始化
        wac.refresh();
}- 【1】处如果 wac 使用了默认编号,则需要重新设置 id 属性,而 contextId 是通过
<context-param />配置中设置 - 【2】处配置如下
<context-param>
    <param-name>contextConfigLocation</param-name>
    <param-value>classpath:config/applicationContext.xml</param-value>
</context-param>- 【3】处提供了定制化 context 的功能,此处不是重点
protected void customizeContext(ServletContext sc, ConfigurableWebApplicationContext wac) {
        List<Class<ApplicationContextInitializer<ConfigurableApplicationContext>>> initializerClasses =
                determineContextInitializerClasses(sc);

        for (Class<ApplicationContextInitializer<ConfigurableApplicationContext>> initializerClass : initializerClasses) {
            Class<?> initializerContextClass =
                    GenericTypeResolver.resolveTypeArgument(initializerClass, ApplicationContextInitializer.class);
            if (initializerContextClass != null && !initializerContextClass.isInstance(wac)) {
                throw new ApplicationContextException(String.format(
                        "Could not apply context initializer [%s] since its generic parameter [%s] " +
                                "is not assignable from the type of application context used by this " +
                                "context loader: [%s]", initializerClass.getName(), initializerContextClass.getName(),
                        wac.getClass().getName()));
            }
            this.contextInitializers.add(BeanUtils.instantiateClass(initializerClass));
        }

        AnnotationAwareOrderComparator.sort(this.contextInitializers);
        for (ApplicationContextInitializer<ConfigurableApplicationContext> initializer : this.contextInitializers) {
            initializer.initialize(wac);
        }
}- 【4】处重点来了,进入 refresh 方法,那熟悉的感觉来了,没错是 Spring IOC 容器的初始化,关于 Spring 容器的初始化,此处不是重点 后续有专门文章讲解
@Override
    public void refresh() throws BeansException, IllegalStateException {
        synchronized (this.startupShutdownMonitor) {
            // 准备刷新的上下文环境 look!
            prepareRefresh();

            //初始化BeanFactory,并进行XML文件读取 look!
            //ApplicationContext是对BeanFactory的功能上的扩展 不但包含了BeanFactory全部功能更在其基础上添加了大量的扩展应用,
            //子类启动refreshBeanFactory的地方
            ConfigurableListableBeanFactory beanFactory = obtainFreshBeanFactory();

            //进入方法前,Spring已经完成了对配置的解析  对BeanFactory进行各种功能填充
            prepareBeanFactory(beanFactory);

            try {
                //子类覆盖方法做额外的处理 设置BeanFactory的后置处理
                postProcessBeanFactory(beanFactory);

                //调用BeanFactory的后处理器,这些后处理器是Bean定义中向容器注册的
                invokeBeanFactoryPostProcessors(beanFactory);

                //注册拦截Bean创建的Bean后处理器,这里只是注册,真正调用的时候在bean的创建过程getBean的时候
                registerBeanPostProcessors(beanFactory);

                //为上下文初始化Message源,不同语言的消息体,国际化处理
                initMessageSource();

                //初始化应用消息广播器,并放入"applicationEventMulticaster" bean中
                initApplicationEventMulticaster();

                //留给子类来初始化其他特殊的Bean
                onRefresh();

                //在所有注册的bean中查找Listener bean 注册到消息广播器中
                registerListeners();

                //实例化剩下的单实例(非惰性的)所有non-lazy-init单件  预实例化
                finishBeanFactoryInitialization(beanFactory);

                // 发布容器事件,结束Refresh过程
                //完成刷新过程,通知生命期处理器 lifecycleProcessor刷新过程,同时发出ContextRefreshEvent通知别人
                finishRefresh();
            } catch (BeansException ex) {
                if (logger.isWarnEnabled()) {
                    logger.warn("Exception encountered during context initialization - " +
                            "cancelling refresh attempt: " + ex);
                }
                //为防止Bean资源占用,在异常处理中,销毁已经在前面过程中生成的单件Bean
                destroyBeans();
                //重置 active标志
                cancelRefresh(ex);

                // Propagate exception to caller.
                throw ex;
            } finally {
                // Reset common introspection caches in Spring's core, since we
                // might not ever need metadata for singleton beans anymore...
                resetCommonCaches();
            }
        }
    }


    protected void finishRefresh() {
        // Clear context-level resource caches (such as ASM metadata from scanning).
        clearResourceCaches();

        // 当Application启动或者停止时,会通过LifecycleProcessor来与所有生命的bean的周期做更新状态更新,而在LifecycleProcessor的使用前首先需要初始化
        initLifecycleProcessor();

        // 启动所有实现了Lifecycle接口的bean
        getLifecycleProcessor().onRefresh();

        //  当完成ApplicationContext初始化的时候,要通过Spring中的事件发布机制来发出ContextRefreshedEvent事件,以保证对应的监听器可以做进一步的逻辑处理
        publishEvent(new ContextRefreshedEvent(this));

        // Participate in LiveBeansView MBean, if active.
        LiveBeansView.registerApplicationContext(this);
至此父Root Spring WebApplicationContext 容器已成功启动并刷新完成准备就绪
子Servlet容器启动
回看 web.xml 配置
<!-- 【1】 Spring配置 -->
<listener>
    <listener-class>org.springframework.web.context.ContextLoaderListener</listener-class>
</listener>
<!-- 指定Spring Bean的配置文件所在目录。默认配置在WEB-INF目录下 -->
<context-param>
    <param-name>contextConfigLocation</param-name>
    <param-value>classpath:config/applicationContext.xml</param-value>
</context-param>


<!-- 【2】 Spring MVC配置 -->
<servlet>
    <servlet-name>spring</servlet-name>
    <servlet-class>org.springframework.web.servlet.DispatcherServlet</servlet-class>
    <!-- 可以自定义servlet.xml配置文件的位置和名称,默认为WEB-INF目录下,名称为[<servlet-name>]-servlet.xml,如spring-servlet.xml  -->
    <init-param>
        <param-name>contextConfigLocation</param-name>
        <param-value>/WEB-INF/spring-servlet.xml</param-value> // 默认
    </init-param>
     <!-- 当值为0或者大于0时,代表容器启动时加载该servlet -->
    <load-on-startup>1</load-on-startup>
</servlet>
<servlet-mapping>
    <servlet-name>spring</servlet-name>
    <url-pattern>*.do</url-pattern>
</servlet-mapping>
上文我们已经分析完了【1】的配置,父容器已经准备就绪,下面我们来分析【2】的配置。
Tomcat 容器启动过程会自动加载 org.springframework.web.servlet.DispatcherServlet 的初始化,在 DispatherServlet 初始化的过程中会完成 Servlet WebApplicationContext 容器的初始化
DispatcherServlet 也是 Servlet 规范,Tomcat 在启动的过程中会为每一个 Servlet 创建对象,同时进行初始化,它主要负责初始化 Spring MVC 的各个组件,以及处理客户端的请求。
可以理解为请求的 Servlet 都交由 DispatcherServlet 统一进行分发处理。
来看下 DispatcherServlet 类关系

首先我们来看 HttpServletBean
org.springframework.web.servlet.HttpServletBean 实现了 EnvironmentCapable、EnvironmentAware 接口,继承 HttpServlet 抽象类,它主要负责将 ServletConfig 设置到当前 Servlet 对象中。
@SuppressWarnings("serial")
public abstract class HttpServletBean extends HttpServlet implements EnvironmentCapable, EnvironmentAware {

    /**
     * Logger available to subclasses.
     */
    protected final Log logger = LogFactory.getLog(getClass());

    @Nullable
    private ConfigurableEnvironment environment;

    /**
     * 需要的配置的属性集合
     */
    private final Set<String> requiredProperties = new HashSet<>(4);


    protected final void addRequiredProperty(String property) {
        // 添加 property
        this.requiredProperties.add(property);
    }

    /**
     * Set the {@code Environment} that this servlet runs in.
     * <p>Any environment set here overrides the {@link StandardServletEnvironment}
     * provided by default.
     *
     * @throws IllegalArgumentException if environment is not assignable to
     *                                  {@code ConfigurableEnvironment}
     *                                  实现自 EnvironmentAware 接口,自动注入
     */
    @Override
    public void setEnvironment(Environment environment) {
        Assert.isInstanceOf(ConfigurableEnvironment.class, environment, "ConfigurableEnvironment required");
        this.environment = (ConfigurableEnvironment) environment;
    }

    /**
     * Return the {@link Environment} associated with this servlet.
     * <p>If none specified, a default environment will be initialized via
     * {@link #createEnvironment()}.
     * 实现自 EnvironmentCapable 接口
     */
    @Override
    public ConfigurableEnvironment getEnvironment() {
        if (this.environment == null) {
            this.environment = createEnvironment();
        }
        return this.environment;
    }


    protected ConfigurableEnvironment createEnvironment() {
        return new StandardServletEnvironment();
    }


    @Override
    public final void init() throws ServletException {

        // Set bean properties from init parameters.
        // 【1】解析 <init-param /> 标签,封装到 PropertyValues pvs 中
        PropertyValues pvs = new ServletConfigPropertyValues(getServletConfig(), this.requiredProperties);
        if (!pvs.isEmpty()) {
            try {
                // 【2】将当前的这个 Servlet 对象,转化成一个 BeanWrapper 对象。从而能够以 Spring 的方式来将 pvs 注入到该 BeanWrapper 对象中
                BeanWrapper bw = PropertyAccessorFactory.forBeanPropertyAccess(this);
                ResourceLoader resourceLoader = new ServletContextResourceLoader(getServletContext());
                // 注册自定义属性编辑器, Resource 类型的属性,将会使用 ResourceEditor 进行解析
                bw.registerCustomEditor(Resource.class, new ResourceEditor(resourceLoader, getEnvironment()));
                // 空实现,子类实现
                initBeanWrapper(bw);
                // 以 Spring 方式将 pvs 注入到 BeanWrapper中
                bw.setPropertyValues(pvs, true);
            } catch (BeansException ex) {
                if (logger.isErrorEnabled()) {
                    logger.error("Failed to set bean properties on servlet '" + getServletName() + "'", ex);
                }
                throw ex;
            }
        }

        // Let subclasses do whatever initialization they like.
        // 【3】自定义初始化逻辑,子类实现
        initServletBean();
    }


    protected void initBeanWrapper(BeanWrapper bw) throws BeansException {
    }

    protected void initServletBean() throws ServletException {
    }

}
init 方法中【1】处解析 Servlet 配置的 <init-param /> 标签,封装到 PropertyValues pvs 中
ServletConfigPropertyValues 是 HttpServletBean 的私有静态类,继承 MutablePropertyValues 类
/**
     * PropertyValues implementation created from ServletConfig init parameters.
     * 静态内部类,ServletConfig 的 PropertyValues 封装实现类
     */
    private static class ServletConfigPropertyValues extends MutablePropertyValues {


        public ServletConfigPropertyValues(ServletConfig config, Set<String> requiredProperties) throws ServletException {
            // 获取缺失的属性集合
            Set<String> missingProps = (!CollectionUtils.isEmpty(requiredProperties) ? new HashSet<>(requiredProperties) : null);

            // 遍历ServletConfig 的初始化参数集合,添加至 ServletConfigPropertyValues 中,从 missingProps 中移除
            Enumeration<String> paramNames = config.getInitParameterNames();
            while (paramNames.hasMoreElements()) {
                String property = paramNames.nextElement();
                Object value = config.getInitParameter(property);
                // 添加到 ServletConfigPropertyValues 中
                addPropertyValue(new PropertyValue(property, value));
                // 从 missingProps 中移除
                if (missingProps != null) {
                    missingProps.remove(property);
                }
            }

            // Fail if we are still missing properties.
            // 如果存在缺失的属性,抛出 ServletException 异常
            if (!CollectionUtils.isEmpty(missingProps)) {
                throw new ServletException("Initialization from ServletConfig for servlet '" + config.getServletName() + "' failed; the following required properties were missing: " + StringUtils.collectionToDelimitedString(missingProps, ", "));
            }
        }
    }
init 方法中【2】处将当前的这个 Servlet 对象,转化成一个 BeanWrapper 对象(BeanWrapper 是 Spring 提供的一个用来操作 Java Bean 属性的工具),以 Spring 的方式来将 pvs 注入到该 BeanWrapper 对象中,
init 方法中【3】处调用了initServletBean();
    protected void initServletBean() throws ServletException {
    }
由子类实现,由 FrameworkServlet 具体实现
FrameworkServlet 实现 ApplicationContextAware 接口,继承 HttpServletBean 抽象类,负责初始化 Servlet WebApplicationContext 容器,主要负责 Servlet WebApplicationContext 容器的初始化。
public abstract class FrameworkServlet extends HttpServletBean implements ApplicationContextAware {

    @Nullable
    private WebApplicationContext webApplicationContext;

    public FrameworkServlet(WebApplicationContext webApplicationContext) {
        this.webApplicationContext = webApplicationContext;
    }


    // 省略部分代码
    @Override
    protected final void initServletBean() throws ServletException {
        getServletContext().log("Initializing Spring " + getClass().getSimpleName() + " '" + getServletName() + "'");
        if (logger.isInfoEnabled()) {
            logger.info("Initializing Servlet '" + getServletName() + "'");
        }
        // 记录开始时间
        long startTime = System.currentTimeMillis();

        try {
            // 【1】初始化 WebApplicationContext
            this.webApplicationContext = initWebApplicationContext();
            // 空实现,子类重写
            initFrameworkServlet();
        }
        catch (ServletException | RuntimeException ex) {
            logger.error("Context initialization failed", ex);
            throw ex;
        }

        if (logger.isDebugEnabled()) {
            String value = this.enableLoggingRequestDetails ?
                    "shown which may lead to unsafe logging of potentially sensitive data" :
                    "masked to prevent unsafe logging of potentially sensitive data";
            logger.debug("enableLoggingRequestDetails='" + this.enableLoggingRequestDetails +
                    "': request parameters and headers will be " + value);
        }

        if (logger.isInfoEnabled()) {
            logger.info("Completed initialization in " + (System.currentTimeMillis() - startTime) + " ms");
        }
    }


}
代码【1】处 initWebApplicationContext(); 对 Servlet WebApplicationContext 进行了初始化
protected WebApplicationContext initWebApplicationContext() {
        // 【A】获取父Root WebApplicationContext 对象
        WebApplicationContext rootContext =
                WebApplicationContextUtils.getWebApplicationContext(getServletContext());
        // 定义一个 WebApplicationContext 对象
        WebApplicationContext wac = null;

        // 【B】如果构造方法已经传入 webApplicationContext 属性,则直接使用
        if (this.webApplicationContext != null) {
            // 赋值使用构造函数中传递的
            wac = this.webApplicationContext;
            // 如果是 ConfigurableWebApplicationContext 类型且尚未激活则初始化
            if (wac instanceof ConfigurableWebApplicationContext) {
                ConfigurableWebApplicationContext cwac = (ConfigurableWebApplicationContext) wac;
                // 未激活
                if (!cwac.isActive()) {
                    if (cwac.getParent() == null) {
                                     // 设置父子容器关系,父 Root 容器为 Spring WebApplicationContext
                        cwac.setParent(rootContext);
                    }
                    // 【C】配置刷新 wac
                    configureAndRefreshWebApplicationContext(cwac);
                }
            }
        }
        // 如果构造函数中未传递 webApplicationContext
        if (wac == null) {
            // 【D】找到一个 WebApplicationContext
            wac = findWebApplicationContext();
        }
        if (wac == null) {
            // 【E】找不到则创建一个 WebApplicationContext
            wac = createWebApplicationContext(rootContext);
        }

        // 【F】如果未触发刷新事件,则主动触发刷新事件
        if (!this.refreshEventReceived) {
            synchronized (this.onRefreshMonitor) {
                onRefresh(wac);
            }
        }

        //  context 设置到 ServletContext 中
        if (this.publishContext) {
            // Publish the context as a servlet context attribute.
            String attrName = getServletContextAttributeName();
            getServletContext().setAttribute(attrName, wac);
        }

        return wac;
}首先我们先看上述代码【A】处
WebApplicationContext rootContext =
                WebApplicationContextUtils.getWebApplicationContext(getServletContext());
获取父 root WebApplicationContext,这里可以看出通过 getWebApplicationContext 方法调用获得的 WebApplicationContext 对象实际就是我们前面分析过的在父 Root 容器启动时 initWebApplicationContext 初始化的。
public abstract class WebApplicationContextUtils {

    /**
    * 获取父 WebApplicationContext 对象
    */
   @Nullable
    public static WebApplicationContext getWebApplicationContext(ServletContext sc) {
        // String ROOT_WEB_APPLICATION_CONTEXT_ATTRIBUTE = WebApplicationContext.class.getName() + ".ROOT";
        return getWebApplicationContext(sc, WebApplicationContext.ROOT_WEB_APPLICATION_CONTEXT_ATTRIBUTE);
    }

    @Nullable
    public static WebApplicationContext getWebApplicationContext(ServletContext sc, String attrName) {
        Assert.notNull(sc, "ServletContext must not be null");
        Object attr = sc.getAttribute(attrName);
        if (attr == null) {
            return null;
        }
        if (attr instanceof RuntimeException) {
            throw (RuntimeException) attr;
        }
        if (attr instanceof Error) {
            throw (Error) attr;
        }
        if (attr instanceof Exception) {
            throw new IllegalStateException((Exception) attr);
        }
        if (!(attr instanceof WebApplicationContext)) {
            throw new IllegalStateException("Context attribute is not of type WebApplicationContext: " + attr);
        }
        return (WebApplicationContext) attr;
    }
}再来看下代码【B】处,如果构造方法已经传入 webApplicationContext 属性,则直接使用,如果未激活则调用 configureAndRefreshWebApplicationContext 配置刷新WebApplicationContext,并设置父子容器关系,父容器为 Root WebApplicationContext。
如果构造方法未传入 webApplicationContext属性,则指向代码【D】处,我们一会分析。
先来看下configureAndRefreshWebApplicationContext做了什么
protected void configureAndRefreshWebApplicationContext(ConfigurableWebApplicationContext wac) {
        // 如果 wac 使用了默认编号,则重新设置 id 属性
        if (ObjectUtils.identityToString(wac).equals(wac.getId())) {
            // 使用 contextId 属性
            if (this.contextId != null) {
                wac.setId(this.contextId);
            }
            else {
                // 自动生成
                wac.setId(ConfigurableWebApplicationContext.APPLICATION_CONTEXT_ID_PREFIX +
                        ObjectUtils.getDisplayString(getServletContext().getContextPath()) + '/' + getServletName());
            }
        }

        // 设置 wac 的 servletContext、servletConfig、namespace 属性
        wac.setServletContext(getServletContext());
        wac.setServletConfig(getServletConfig());
        wac.setNamespace(getNamespace());
        // 【Z】添加监听器 SourceFilteringListener 到 wac 中
        wac.addApplicationListener(new SourceFilteringListener(wac, new ContextRefreshListener()));

        ConfigurableEnvironment env = wac.getEnvironment();
        if (env instanceof ConfigurableWebEnvironment) {
            ((ConfigurableWebEnvironment) env).initPropertySources(getServletContext(), getServletConfig());
        }
        // 后置处理,空实现,由子类实现
        postProcessWebApplicationContext(wac);
        // 自定义初始化,空实现,由子类实现
        applyInitializers(wac);
        // Servlet Spring 容器刷新,初始化 IOC 容器
        wac.refresh();
    }
我们可以发现这块代码和我们前面分析过的父 Root 容器启动时的代码很像,最后刷新了 wac 容器,并完成了容器的初始化,这个容器实际上时 Spring Servlet 容器。
来着重看下代码【Z】处
// 【Z】添加监听器 SourceFilteringListener 到 wac 中
        wac.addApplicationListener(new SourceFilteringListener(wac, new ContextRefreshListener()));
SourceFilteringListener 实现 GenericApplicationListener、SmartApplicationListener 监听器,实现将原始对象触发的事件,转发给指定监听器。
该监听器是在容器 refresh 完成时调用 finishRefresh(); 时触发广播回调
        //  当完成ApplicationContext初始化的时候,要通过Spring中的事件发布机制来发出ContextRefreshedEvent事件,以保证对应的监听器可以做进一步的逻辑处理
publishEvent(new ContextRefreshedEvent(this));
protected void publishEvent(Object event, @Nullable ResolvableType eventType) {
Assert.notNull(event, "Event must not be null");
// Decorate event as an ApplicationEvent if necessary
ApplicationEvent applicationEvent;
if (event instanceof ApplicationEvent) {
applicationEvent = (ApplicationEvent) event;
} else {
applicationEvent = new PayloadApplicationEvent<>(this, event);
if (eventType == null) {
eventType = ((PayloadApplicationEvent<?>) applicationEvent).getResolvableType();
}
}
// Multicast right now if possible - or lazily once the multicaster is initialized
if (this.earlyApplicationEvents != null) {
this.earlyApplicationEvents.add(applicationEvent);
} else {
// 广播事件 会回调 SourceFilteringListener
getApplicationEventMulticaster().multicastEvent(applicationEvent, eventType);
}
// Publish event via parent context as well...
if (this.parent != null) {
if (this.parent instanceof AbstractApplicationContext) {
((AbstractApplicationContext) this.parent).publishEvent(event, eventType);
} else {
this.parent.publishEvent(event);
}
}
}getApplicationEventMulticaster().multicastEvent(applicationEvent, eventType);发起广播事件,回调 SourceFilteringListener 的 onApplicationEvent 方法
public class SourceFilteringListener implements GenericApplicationListener, SmartApplicationListener {

    private final Object source;

    /**
     * 代理监听器
     */
    @Nullable
    private GenericApplicationListener delegate;


    public SourceFilteringListener(Object source, ApplicationListener<?> delegate) {
        this.source = source;
        this.delegate = (delegate instanceof GenericApplicationListener ?
                (GenericApplicationListener) delegate : new GenericApplicationListenerAdapter(delegate));
    }

    /**
     * Create a SourceFilteringListener for the given event source,
     * expecting subclasses to override the {@link #onApplicationEventInternal}
     * method (instead of specifying a delegate listener).
     *
     * @param source the event source that this listener filters for,
     *               only processing events from this source
     */
    protected SourceFilteringListener(Object source) {
        this.source = source;
    }


    /**
     * 关键代码
     *
     * @param event the event to respond to
     */
    @Override
    public void onApplicationEvent(ApplicationEvent event) {
        if (event.getSource() == this.source) {
            onApplicationEventInternal(event);
        }
    }

    @Override
    public boolean supportsEventType(ResolvableType eventType) {
        return (this.delegate == null || this.delegate.supportsEventType(eventType));
    }

    @Override
    public boolean supportsEventType(Class<? extends ApplicationEvent> eventType) {
        return supportsEventType(ResolvableType.forType(eventType));
    }

    @Override
    public boolean supportsSourceType(@Nullable Class<?> sourceType) {
        return (sourceType != null && sourceType.isInstance(this.source));
    }

    @Override
    public int getOrder() {
        return (this.delegate != null ? this.delegate.getOrder() : Ordered.LOWEST_PRECEDENCE);
    }

    protected void onApplicationEventInternal(ApplicationEvent event) {
        if (this.delegate == null) {
            throw new IllegalStateException(
                    "Must specify a delegate object or override the onApplicationEventInternal method");
        }
        // 转交代理监听器
        this.delegate.onApplicationEvent(event);
    }

}
onApplicationEvent 判断事件的来源,就是原始类 source 。如果是,则调用 onApplicationEventInternal(ApplicationEvent event) 方法,将事件转发给 delegate 监听器。
// FrameworkServlet.java

private class ContextRefreshListener implements ApplicationListener<ContextRefreshedEvent> {

        @Override
        public void onApplicationEvent(ContextRefreshedEvent event) {
            FrameworkServlet.this.onApplicationEvent(event);
        }
    }
FrameworkServlet.this.onApplicationEvent(event); 实现如下
public void onApplicationEvent(ContextRefreshedEvent event) {
        // 是否刷新事件设置成 true 代表已刷新
        this.refreshEventReceived = true;
        // 刷新事件
        synchronized (this.onRefreshMonitor) {
            onRefresh(event.getApplicationContext());
        }
}onRefresh代码如下
public abstract class FrameworkServlet extends HttpServletBean implements ApplicationContextAware {

    protected void onRefresh(ApplicationContext context) {
        // For subclasses: do nothing by default.
    }

}
这是一个空方法,具体的实现,在子类 DispatcherServlet 中
// DispatcherServlet.java

    @Override
    protected void onRefresh(ApplicationContext context) {
        initStrategies(context);
    }

    // 初始化 Spring MVC 9大组件
    protected void initStrategies(ApplicationContext context) {
        // 初始化 MultipartResolver
        initMultipartResolver(context);
        // 初始化 LocaleResolver
        initLocaleResolver(context);
        // 初始化 ThemeResolver
        initThemeResolver(context);
        // 初始化 HandlerMappings
        initHandlerMappings(context);
        // 初始化 HandlerAdapters
        initHandlerAdapters(context);
        // 初始化 HandlerExceptionResolvers
        initHandlerExceptionResolvers(context);
        // 初始化 RequestToViewNameTranslator
        initRequestToViewNameTranslator(context);
        // 初始化 ViewResolvers
        initViewResolvers(context);
        // 初始化 FlashMapManager
        initFlashMapManager(context);
    }
通过我们的分析可以发现 Spring MVC 的九大组件是通过 Spring 容器的事件驱动初始的,我们先暂时跳过这里 initStrategies 的分析,由本系列《Spring MVC 篇之请求处理流程》中说明。
刚刚我们说到如果构造方法未传入 webApplicationContext属性,则指向代码【D】处,调用 findWebApplicationContext(); 找到一个 WebApplicationContext
@Nullable
    protected WebApplicationContext findWebApplicationContext() {
        String attrName = getContextAttribute();
        // 如果没配置 contextAttribute,不会查找
        if (attrName == null) {
            return null;
        }
        // 从 ServletContext 中,获得属性名对应的 WebApplicationContext 对象
        WebApplicationContext wac =
                WebApplicationContextUtils.getWebApplicationContext(getServletContext(), attrName);
        // 不存在异常
        if (wac == null) {
            throw new IllegalStateException("No WebApplicationContext found: initializer not registered?");
        }
        return wac;
    }
一般情况下我们不会配置 contextAttribute 所以,通常情况这个方法返回 null 结束了。
findWebApplicationContext(); 返回了null,就会走到代码【E】处,调用createWebApplicationContext(rootContext);方法创建了一个 WebApplicationContext
protected WebApplicationContext createWebApplicationContext(@Nullable WebApplicationContext parent) {
        return createWebApplicationContext((ApplicationContext) parent);
    }

    protected WebApplicationContext createWebApplicationContext(@Nullable ApplicationContext parent) {
        Class<?> contextClass = getContextClass();
        if (!ConfigurableWebApplicationContext.class.isAssignableFrom(contextClass)) {
            throw new ApplicationContextException(
                    "Fatal initialization error in servlet with name '" + getServletName() +
                    "': custom WebApplicationContext class [" + contextClass.getName() +
                    "] is not of type ConfigurableWebApplicationContext");
        }
        ConfigurableWebApplicationContext wac =
                (ConfigurableWebApplicationContext) BeanUtils.instantiateClass(contextClass);

        wac.setEnvironment(getEnvironment());
        wac.setParent(parent);
        String configLocation = getContextConfigLocation();
        if (configLocation != null) {
            wac.setConfigLocation(configLocation);
        }
        // 配置并刷新 WebApplicationContext
        configureAndRefreshWebApplicationContext(wac);

        return wac;
    }
最终会调用 configureAndRefreshWebApplicationContext(wac);方法同样会完成 wac 容器的初始化
我们在回头看向代码【F】处,如果未触发刷新事件,则主动触发刷新事件,也就是说 SourceFilteringListener 监听器监听到刷新事件就不会执行下面这段代码, 反之则会触发主动刷新事件。
        // 【F】如果未触发刷新事件,则主动触发刷新事件
        if (!this.refreshEventReceived) {
            // Either the context is not a ConfigurableApplicationContext with refresh
            // support or the context injected at construction time had already been
            // refreshed -> trigger initial onRefresh manually here.
            synchronized (this.onRefreshMonitor) {
                // 刷新
                onRefresh(wac);
            }
        }
至此父子容器均完成初始化工作,准备就绪可以开始接受请求了。
进化篇-Servlet 3.0 的诞生
在 xml 中编写配置是相当麻烦的一件事,随着 Spring 的普及和迭代,它也提供了另一种更友好更便捷的方式: java 配置类。
从 xml 时代到 java 配置类和 xml 并存的时代在到SpringBoot的出现,现在 xml 已经可以被彻底抛弃。
这也离不开 Servlet3.0 的诞生
Servlet 3.0 介绍
Servlet 3.0 作为 Java EE 6 规范体系中一员,随着 Java EE 6 规范一起发布。该版本在前一版本(Servlet 2.5)的基础上提供了若干新特性用于简化 Web 应用的开发和部署。
例如异步处理支持,新增的注解支持,可插性支持,其中一项新特性便是提供了无 xml 配置的特性。
Servlet3.0 首先提供了 @WebServlet ,@WebFilter 等注解,这样便有了抛弃 web.xml 的第一个途径,凭借注解声明 servlet 和 filter 来做到这一点。
除了这种方式,Servlet3.0 规范还提供了更强大的功能,可以在运行时动态注册 Servlet ,Filter,Listener。以 Servlet 为例,过滤器与监听器与之类似。ServletContext 为动态配置 Servlet 增加了如下方法:
- ServletRegistration.Dynamic addServlet(String servletName,Class<? extends Servlet> servletClass)
- ServletRegistration.Dynamic addServlet(String servletName, Servlet servlet)
- ServletRegistration.Dynamic addServlet(String servletName, String className)
- T createServlet(Class clazz)
- ServletRegistration getServletRegistration(String servletName)
- Map<String,? extends ServletRegistration> getServletRegistrations()
其中前三个方法的作用是相同的,只是参数类型不同而已;
通过 createServlet(Class clazz) 方法创建的 Servlet,通常需要做一些自定义的配置,然后使用 addServlet(...) 方法来将其动态注册为一个可以用于服务的 Servlet。
两个 getServletRegistration() 方法主要用于动态为 Servlet 增加映射信息,这等价于在 web.xml 中使用 标签为存在的 Servlet 增加映射信息。
以上 ServletContext 新增的方法:
- 要么是在 javax.servlet.ServletContextListener 的 contextInitialized(ServletContextEvent sce) 方法中调用。
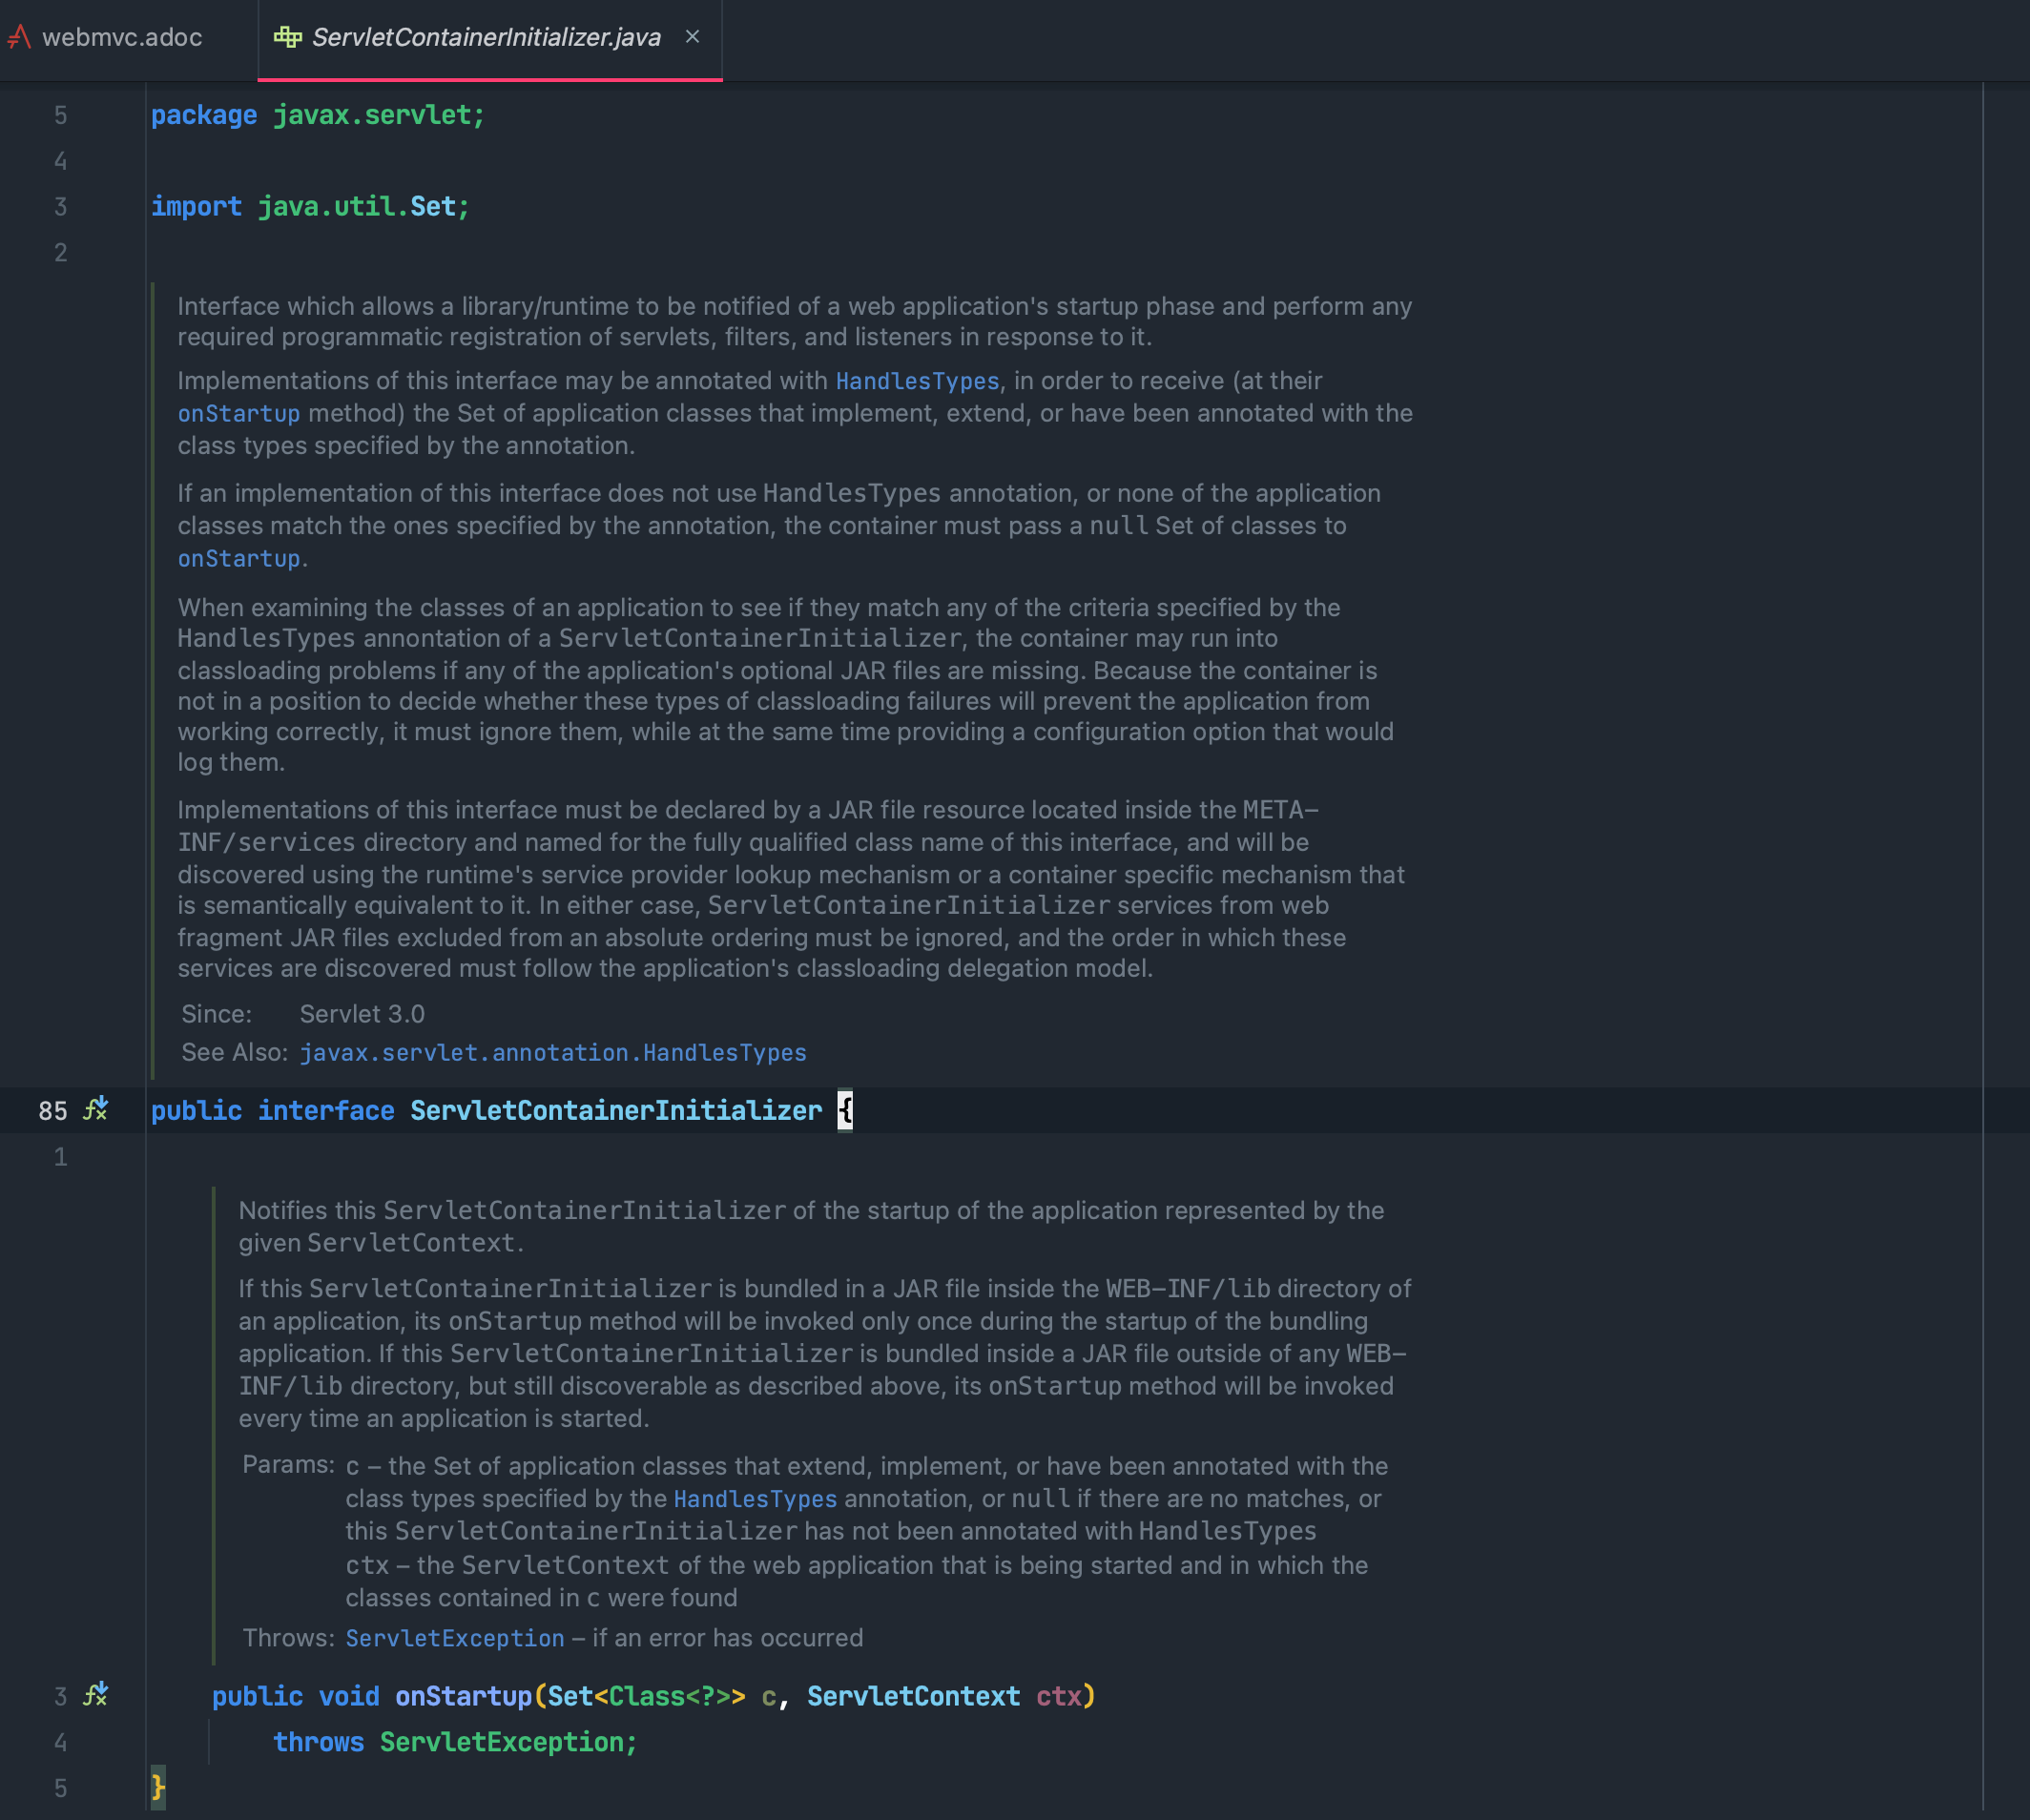
- 要么是在 javax.servlet.ServletContainerInitializer 的 onStartup(Set<Class<?>> c, ServletContext ctx) 方法中调用。
无 xml 配置的实现原理
ServletContainerInitializer 也是 Servlet 3.0 新增的一个接口,容器在启动时使用 JAR 服务 API(JAR Service API) 来发现 ServletContainerInitializer 的实现类,并且容器利用了 SPI 机制将 WEB-INF/lib 目录下 JAR 包中的类都交给该类的 onStartup(...) 方法处理,我们通常需要在该实现类上使用 @HandlesTypes 注解来指定希望被处理的类,过滤掉不希望给 onStartup(...) 处理的类。这样来 Spring MVC 也就可以抛弃 web.xml 了。
利用 SPI 机制


HandlesTypes 注解帮助找到了所有实现 WebApplicationInitializer 接口的实现
@HandlesTypes(WebApplicationInitializer.class)
public class SpringServletContainerInitializer implements ServletContainerInitializer {

    @Override
    public void onStartup(@Nullable Set<Class<?>> webAppInitializerClasses, ServletContext servletContext)
            throws ServletException {

        List<WebApplicationInitializer> initializers = new LinkedList<>();

        if (webAppInitializerClasses != null) {
            for (Class<?> waiClass : webAppInitializerClasses) {
                if (!waiClass.isInterface() && !Modifier.isAbstract(waiClass.getModifiers()) &&
                        WebApplicationInitializer.class.isAssignableFrom(waiClass)) {
                    try {
                        // 添加实现到集合中
                        initializers.add((WebApplicationInitializer)
                                ReflectionUtils.accessibleConstructor(waiClass).newInstance());
                    }
                    catch (Throwable ex) {
                        throw new ServletException("Failed to instantiate WebApplicationInitializer class", ex);
                    }
                }
            }
        }

        if (initializers.isEmpty()) {
            servletContext.log("No Spring WebApplicationInitializer types detected on classpath");
            return;
        }

        servletContext.log(initializers.size() + " Spring WebApplicationInitializers detected on classpath");
        AnnotationAwareOrderComparator.sort(initializers);
        // 遍历所有WebApplicationInitializer的实现
        for (WebApplicationInitializer initializer : initializers) {
            initializer.onStartup(servletContext);
        }
    }

}
Spring 官网给的 MVC 例子,创建一个 MyWebApplicationInitializer 实现,上一步的 initializer.onStartup(servletContext); 就会调用我们自定义的 MyWebApplicationInitializer 的 onStartup 方法
public class MyWebApplicationInitializer implements WebApplicationInitializer {

    // Spring 启动后会执行
    @Override
    public void onStartup(ServletContext servletContext) {

        // 创建 IOC 容器,准备一个空的 IOC 容器,此时没有 refresh
        AnnotationConfigWebApplicationContext context = new AnnotationConfigWebApplicationContext();
        context.register(AppConfig.class);

        // 注册 Servlet 配置 DispatcherServlet 传入了 IOC 容器
        DispatcherServlet servlet = new DispatcherServlet(context);
        // 所有请求交给 DispatherServlet
        ServletRegistration.Dynamic registration = servletContext.addServlet("app", servlet);
        registration.setLoadOnStartup(1);
        registration.addMapping("/app/*");
        // 此时父子容器均未 refresh,通过 ContextLoaderListener 监听器回调刷新初始化父 Root 容器,通过 Tomcat 启动调用 DispatherServlet 刷新初始化子 Servlet 容器
    }
}
Spring MVC 实际并没有在 SpringServletContainerInitializer 中直接对 Servlet 和 Filter 进行注册,而是委托给了一个陌生的类 WebApplicationInitializer。
WebApplicationInitializer 类便是 spring 用来初始化 web 环境的委托者类
我们可以看到 WebApplicationInitializer 提供了 3 个实现类
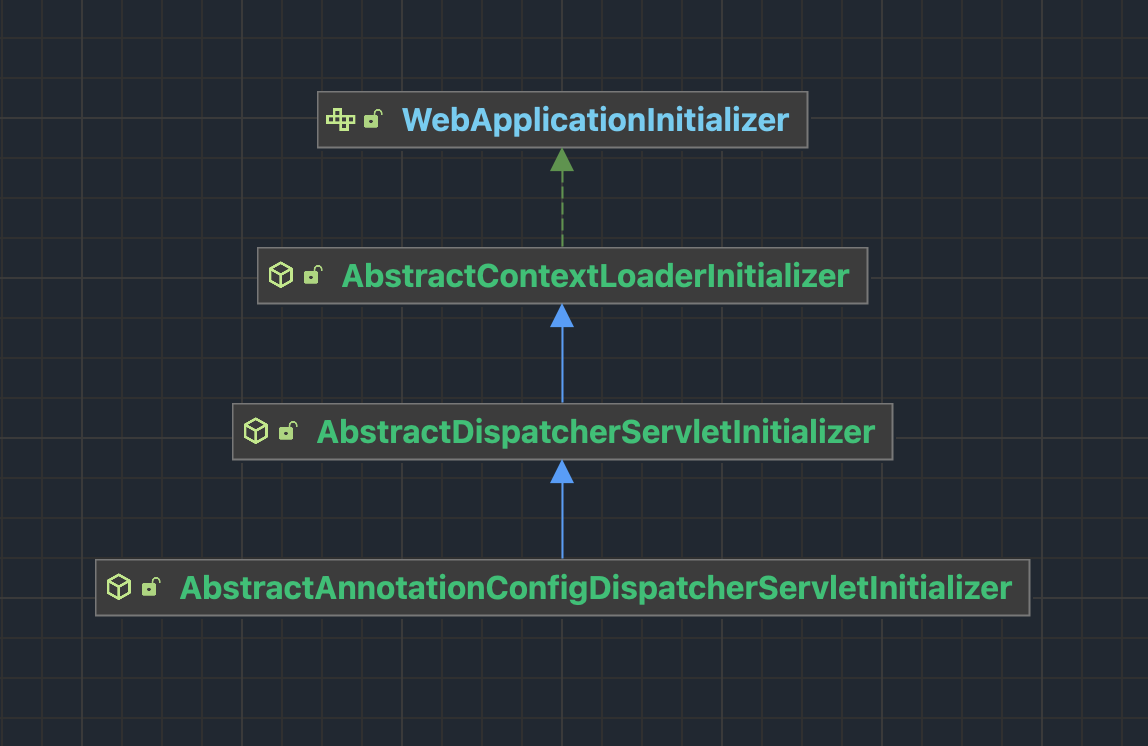
抽象 AbstractDispatcherServletInitializer 实现 onStartup 方法
public abstract class AbstractDispatcherServletInitializer extends AbstractContextLoaderInitializer {

    public static final String DEFAULT_SERVLET_NAME = "dispatcher";


    @Override
    public void onStartup(ServletContext servletContext) throws ServletException {
        // 【1】调用父类注册并初始化 Web 容器
        super.onStartup(servletContext);
        // 注册并初始化 DispatcherServlet
        registerDispatcherServlet(servletContext);
    }

    protected void registerDispatcherServlet(ServletContext servletContext) {
        // 获得 Servlet 名
        String servletName = getServletName();
        Assert.hasLength(servletName, "getServletName() must not return null or empty");

        // 【2】创建 Servlet WebApplicationContext 对象 抽象方法由子类实现
        WebApplicationContext servletAppContext = createServletApplicationContext();
        Assert.notNull(servletAppContext, "createServletApplicationContext() must not return null");

        // 【3】创建 FrameworkServlet 对象
        FrameworkServlet dispatcherServlet = createDispatcherServlet(servletAppContext);
        Assert.notNull(dispatcherServlet, "createDispatcherServlet(WebApplicationContext) must not return null");
        dispatcherServlet.setContextInitializers(getServletApplicationContextInitializers());

        ServletRegistration.Dynamic registration = servletContext.addServlet(servletName, dispatcherServlet);
        if (registration == null) {
            throw new IllegalStateException("Failed to register servlet with name '" + servletName + "'. " +
                    "Check if there is another servlet registered under the same name.");
        }

        registration.setLoadOnStartup(1);
        registration.addMapping(getServletMappings());
        registration.setAsyncSupported(isAsyncSupported());

        // 注册过滤器
        Filter[] filters = getServletFilters();
        if (!ObjectUtils.isEmpty(filters)) {
            for (Filter filter : filters) {
                registerServletFilter(servletContext, filter);
            }
        }

        customizeRegistration(registration);
    }


    protected FrameworkServlet createDispatcherServlet(WebApplicationContext servletAppContext) {
        return new DispatcherServlet(servletAppContext);
    }

    protected String getServletName() {
        return DEFAULT_SERVLET_NAME;
    }

}代码【3】处,创建 FrameworkServlet 的子类 DispatcherServlet 对象,传入的构造函数为 Servlet WebApplicationContext
代码【2】处,createServletApplicationContext();创建 Servlet WebApplicationContext 对象 抽象方法由子类实现
AbstractDispatcherServletInitializer 的子类 AbstractAnnotationConfigDispatcherServletInitializer
public abstract class AbstractAnnotationConfigDispatcherServletInitializer
        extends AbstractDispatcherServletInitializer {

    @Override
    @Nullable
    protected WebApplicationContext createRootApplicationContext() {
        Class<?>[] configClasses = getRootConfigClasses();
        if (!ObjectUtils.isEmpty(configClasses)) {
            AnnotationConfigWebApplicationContext context = new AnnotationConfigWebApplicationContext();
            context.register(configClasses);
            return context;
        }
        else {
            return null;
        }
    }


    @Override
    protected WebApplicationContext createServletApplicationContext() {
        AnnotationConfigWebApplicationContext context = new AnnotationConfigWebApplicationContext();
        Class<?>[] configClasses = getServletConfigClasses();
        if (!ObjectUtils.isEmpty(configClasses)) {
            context.register(configClasses);
        }
        return context;
    }

    @Nullable
    protected abstract Class<?>[] getRootConfigClasses();


    @Nullable
    protected abstract Class<?>[] getServletConfigClasses();

}
createServletApplicationContext 用于创建 WebApplicationContext 对象,该方法由子类 AbstractAnnotationConfigDispatcherServletInitializer 重写,并且创建的 WebApplicationContext 的子类 AnnotationConfigWebApplicationContext 对象。
代码【1】处 super.onStartup(servletContext); 调用父类注册并初始化 Web 容器
来看下抽象 AbstractContextLoaderInitializer 实现 onStartup 方法
public abstract class AbstractContextLoaderInitializer implements WebApplicationInitializer {

    protected final Log logger = LogFactory.getLog(getClass());


    @Override
    public void onStartup(ServletContext servletContext) throws ServletException {
        // 注册监听器,初始化Web IOC容器
        registerContextLoaderListener(servletContext);
    }

    protected void registerContextLoaderListener(ServletContext servletContext) {
        // 创建一个跟容器// 创建Servlet IOC容器 new了一个新容器 由 AbstractAnnotationConfigDispatcherServletInitializer 提供实现
        WebApplicationContext rootAppContext = createRootApplicationContext();
        if (rootAppContext != null) {
            ContextLoaderListener listener = new ContextLoaderListener(rootAppContext);
            listener.setContextInitializers(getRootApplicationContextInitializers());
            servletContext.addListener(listener);
        }
        else {
            logger.debug("No ContextLoaderListener registered, as " +
                    "createRootApplicationContext() did not return an application context");
        }
    }


    @Nullable
    protected abstract WebApplicationContext createRootApplicationContext();

    @Nullable
    protected ApplicationContextInitializer<?>[] getRootApplicationContextInitializers() {
        return null;
    }

}
上述只是创建了父子容器,跟容器通过ContextLoaderListener回调机制来启动容器
public class ContextLoaderListener extends ContextLoader implements ServletContextListener {

    public ContextLoaderListener() {
    }

    public ContextLoaderListener(WebApplicationContext context) {
        super(context);
    }

    @Override
    public void contextInitialized(ServletContextEvent event) {
        // Web应用启动之后,Tomcat触发监听钩子回调机制,初始化跟容器
        initWebApplicationContext(event.getServletContext());
    }

    @Override
    public void contextDestroyed(ServletContextEvent event) {
        closeWebApplicationContext(event.getServletContext());
        ContextCleanupListener.cleanupAttributes(event.getServletContext());
    }

}
到这又到了熟悉的感觉,无缝接轨到了文章开篇分析的 web.xml 时代父容器的启动,这里就不在叙述了。
至此父容器完成了创建和初始化。
Tomcat 在启动的过程中会为每一个 Servlet 创建对象,同时进行初始化,其中包括 DispatherServlet,由 HttpServletBean 类的 init 方法执行初始化,无缝接轨到了文章开篇分析的 web.xml 时代子容器的启动,这里就不在叙述了。
由此完成了父子容器的创建和初始化。
参考资料
https://www.jcp.org/en/jsr/detail?id=315
https://jcp.org/aboutJava/communityprocess/final/jsr315/index.html
https://cloud.tencent.com/developer/article/1491212

作者:MRyan
本文采用 知识共享署名-相同方式共享 4.0 国际许可协议 进行许可。
转载时请注明本文出处及文章链接。本文链接:https://www.wormholestack.com/archives/655/